How do I bill OHIP?
Billing OHIP:
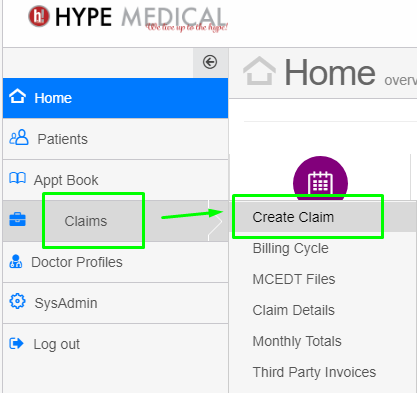
- Click the Claims button in the main menu, search for a patient, and hit Enter.
- Enter service code data, and hit Enter.
- Search or create the next patient, hit Enter, and Go to step #2.
 A more comprehensive explanation . . .
Click the Claims button in the main menu.
The Patient Search tab will load to search or create a patient for whom you wish to make a claim.

Search by health card number to download a new patient's demographics directly from OHIP
Search for a patient using any one or more parameters
A numeric entry of more than 8 characters in the PID/Chart no. field will automatically move the cursor to the "Health card number" field.
Similarly an alphanumeric entry will automatically move the cursor to the "Last Name" field.
Use the Tab key to move to the next field.
Use the Enter key to start the search.
Next, patient demographics and past billing history will load onto the Claim form:
In the “Claim Details” form (image above), you may use the Tab, Enter, and Arrow keys or mouse to navigate the form and fill in the boxes. Some boxes, such as that for Referring MD, will display a small arrow (▼) or 🔍. These are known as "Auto-Complete", “Combo” or “Pull-Down Boxes” that function to quickley select an entry.
The Service Date and Admit Date boxes load a large monthly calendar. To select a date, click once in the service date field. If the date you need is not in the current month, clicking on the small arrows (months scroll) and date (years scroll) [ << mmm yyyy >> ] will let you scroll and select several service dates.
And finally, click Save.
A Note About The Calendar:
HYPEMedical Date Selector:
Click on the date (February 2023) to scroll yearly
Click on << or >> to scroll monthly
Click on a day to choose a date.
Choosing multi in the Service Date box allows the user to select more than one service date and generates multiple dates of service for the service code.
Saving a claim for a new patient will also automatically save a new patient record
*Originally published July 28, 2019
Updated February 9, 2023
Related Articles
OHIP dental billing basics for hospital dental services
Symptoms Use this article when a clerk is asking: Is this dental service insured by OHIP? Can I bill this as a hospital consultation? Why did the claim reject or pay zero? What basic claim fields should I verify before submission? Cause Most dental ...Can I see a patient's billing history as I bill?
Yes, up to 12 month of a patient's billing history is displayed directly on the bottom of the billing form. A patient's complete billing history is displayed one click away in the Patient History tab. The Patient History tab is searchable by date ...One-Click registration, Check-In, booking and billing a patient's appointment in a multi-doctor high-volume walk-in clinic?
In high-volume walk-in clinics, knowing in advance which doctor will attend to a patient is only sometimes possible. That is why in HYPEMedical users can book a patient for an appointment, in a single click, under a generic "Walk-in doctor" from the ...One-Click registration, Check-In, booking and billing a patient's appointment in a multi-doctor high-volume walk-in clinic?
In high-volume walk-in clinics, knowing in advance which doctor will attend to a patient is only sometimes possible. That is why in HYPEMedical users can book a patient for an appointment, in a single click, under a generic "Walk-in doctor" from the ...OHIP Emergency Department Physician Billing (EM) — H-Codes, Consultations, Critical Care, Premiums & After-Hours
Summary / Description: Use this article to bill Emergency Department physician services under OHIP. It covers time-of-day H-assessment codes, Emergency Medicine consultations, critical care, special visit premiums, ambulance detention, ...